Advanced Mac Cleaner is a macOS application, which often infiltrates Mac computers as a browser extension or bundled application. As a rule, Advanced Mac Cleaner installs itself on the machine with other third-party apps skipping past unattentive users.
Is Advanced Mac Cleaner a Virus?
You can easily find dozens of forum threads – including on Apple’s official Support and Communities portals – where users try to answer the question above. The generalized conclusion is – no, Advanced Mac Cleaner is not a virus. But it has many traits attributable to malware.
For instance, The app claims to be running system checks, fixing the detected issues, and deleting the unnecessary files from your device. In reality, users accuse it of providing false scan results and displaying misleading alerts/pop-up messages about Mac having critical issues or viruses.
Some may call it just an aggressive marketing technique, but for others, it is a sign of dishonest business. Which, in turn, is more than enough to get rid of Advanced Mac Cleaner and delete all traces of this app from a Mac.
In case you choose to stick with the app but want to stop seeing Advanced Mac Cleaner popup in Safari or Chrome, the removal of adware-related data should help. First, use ‘Go to folder…’ option to open this location: ~/Library/LaunchAgents/. There, find and delete file com.pcv.hlpramc.plist. Next, restart your computer. After that, locate and erase these two folders: 1) ~/Library/AdvancedMacCleaner; 2) /Library/Application Support/amc – and empty Trash Bin. Finally, remove “Advanced Mac Cleaner” entry from Login Items (Apple menu > System Preferences > Users & Groups > Login Items) and restart your Mac. This should do it.
Why Would You Want to Remove Advanced Mac Cleaner Right Now?
It’s yet to be proved that Advanced Mac Cleaner poses a real threat to your device. But we already can name several reasons why you should consider uninstalling the app immediately for the following reasons:
- Advanced Mac Cleaner tries to lure Mac users into spending money by providing seemingly beneficial deals/offers;
- By changing browser settings, homepage and default search engine, it intrudes your comfort zone and changes you daily user routines;
- It may collect personal information and transmit it to third parties without user’s knowledge.
How To Remove Advanced Mac Cleaner
The easiest way to remove Advanced Mac Cleaner tool is by using Mac’s native functionality. Follow these step-by-step instructions to ensure complete uninstallation of the above app:
- Make sure all the necessary files are backed up before uninstalling Advanced Mac Cleaner. Back up your files using the Time Machine utility or Store in iCloud feature.
- Go to Applications -> Utilities.
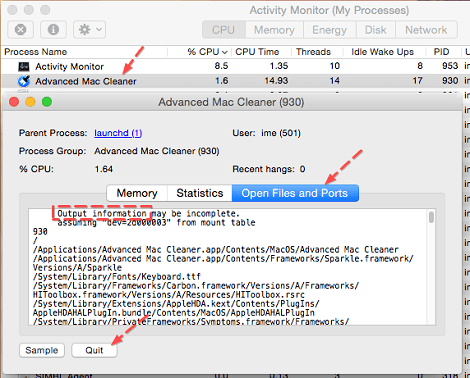
- In Utilities subfolder, access Activity Monitor. Find the Advanced Mac Cleaner, and click the small icon in the upper left corner of Activity Monitor.
- Click on the third tab “Open Files & Ports,” then copy all of the “Output information” displayed for the app and paste it into a text file. It is possible you will need it later to delete the residual application data. Once finished, click “Quit.”
- Go back to the Application folder. Locate the Advanced Mac Cleaner, right-click on it and hit “Move to Trash.”
- Reboot your operating system.
Please, mind that uninstalling Advanced Mac Cleaner by moving it to Trash doesn’t guarantee complete application removal. This way may leave a lot of leftover files, hidden folders, etc. To get rid of the remnants completely, search for files/folders containing the name of the app/its vendor. The typical locations to contain the leftover files are:
- /Library ->
- /Application Support;
- /Preferences;
- /LaunchAgents;
- /LaunchDaemons;
- /PreferencePanes;
- /StartupItems.
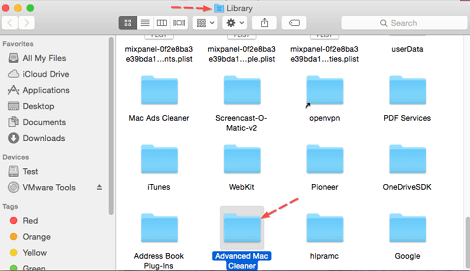
- To manually clean up remaining files, go to the Library folder and delete the Advanced Mac Cleaner folder.
- Use the search bar in the top right corner to look for the leftover folders and files. Type in “Advanced Mac Cleaner” to find the folders with the files that need to be removed. Locate the Application Support folder -> Advanced Mac Cleaner subfolder and other related files in it using the search bar, then right-click on them and hit “Move to Trash.”
- Go back to the Library and locate the Preferences folder. Look for the file named ‘techyutils.cleaner.plist’, right-click on it and hit “Move to Trash.”
- Go back to the Library and locate the Saved Application State folder. Look for the subfolder named ‘com.techyutils.cleaner.savedState’, right-click on it and hit “Move to Trash.”
- Search for Advanced Mac Cleaner .pkg installation files on your Mac. If found, remove the files.
- To delete the Advanced Mac Cleaner from the “Login Items” section:
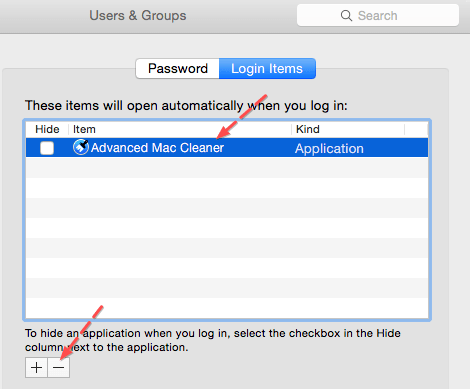
- Open System Preferences located in your Dock at the bottom of the screen.
- Click the “Users & Groups” icon.
- In the “Users & Groups,” click the “Login Items” tab.
- Check Advanced Mac Cleaner in the list of your startup menu, click the “Minus” icon.7. Empty Trash to permanently erase all the Advanced Mac Cleaner related filesTo remove the Advanced Mac Cleaner extension (add-on) from web browsers on your Mac, do the following:
- Safari
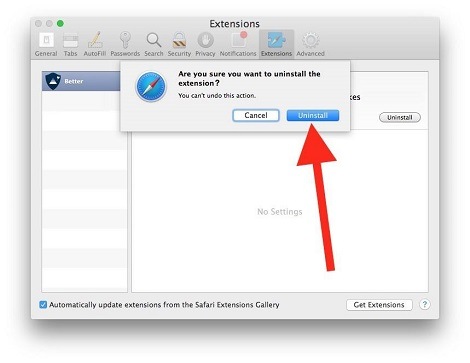
- Start Safari on your Mac, click Safari to open the drop-down menu and choose Preferences.
- Click Extensions
- Select Advanced Mac Cleaner
- Click Uninstall button to remove it.
- Google Chrome:
- Start Google Chrome.
- Press Alt + F key combination.
- Click Tools -> select Extensions.
- Find Advanced Mac Cleaner.
- Click the Trash bin icon to remove it.

- Mozilla Firefox:
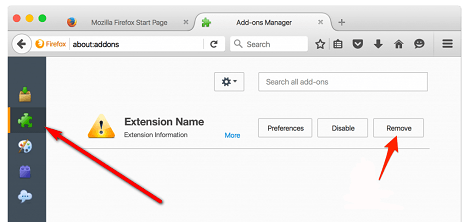
- Start Mozilla Firafox.
- Press Shift + Ctrl + A key combination.
- Find Advanced Mac Cleaner.
- Click Remove
Uninstalling Advanced Mac Cleaner manually is a cumbersome process with a risk of leaving residual app data. This method is less effective and more time-consuming compared to using specially developed third-party apps.
Removing Advanced Mac Cleaner Using Third-Party Apps
Another way to uninstall Advanced Mac Cleaner is to make use of third-party software for apps removal. Luckily, there are dozens of suchlike applications out there, free and paid ones. Yet, there is one that stands out from the entire crowd – MacFly Pro. Though it’s been around just since mid-2017, it proved to be one of the most promising apps of 2018 with clearly visible potential to explode the market of Mac cleaners.
To remove Advanced Mac Cleaner with the help of MacFly Pro, launch the app and move to the Tools tab. Press the Scan button under the Apps section to run a quick scan of all software installed on your Mac.
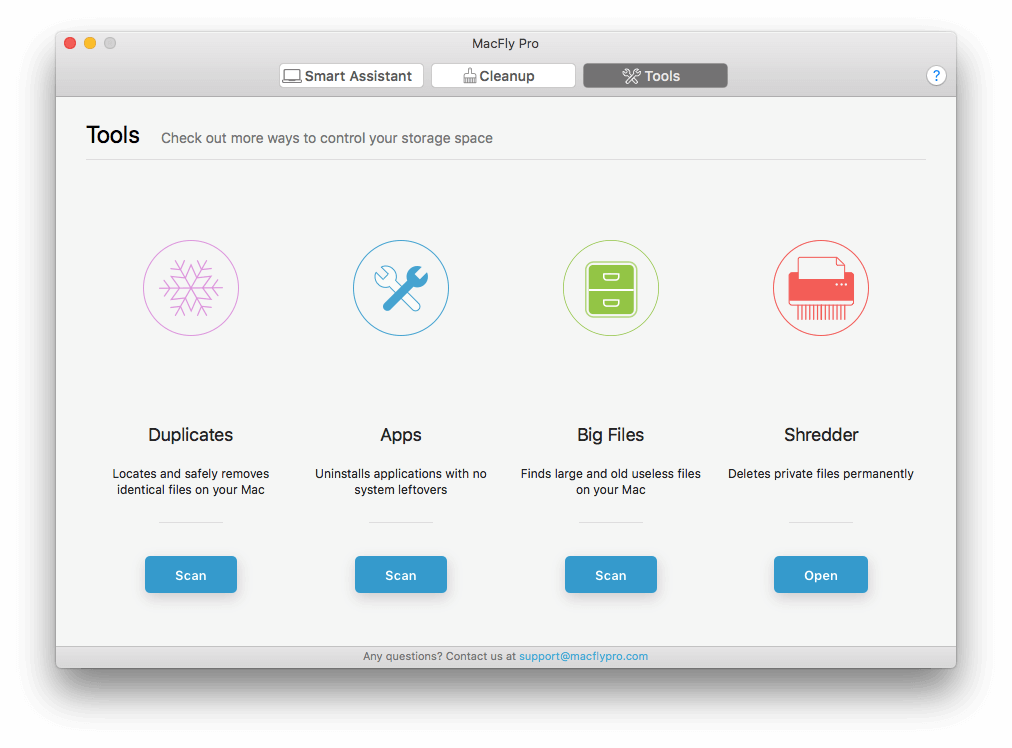
After that, find Advanced Mac Cleaner in the list, put a tick in front of it and press the Uninstall Selected button. MacFly Pro will uninstall the app and automatically detect and move to Trash all app-related files.
Overall, MacFly Pro’s signature feature is Smart Assistant. In short, it is the algorithm that runs silently in the background and monitors the core health parameters of your Apple computer (i.e., RAM load, system junk volume, needless temporary files, etc.). Once any of these markers exceeds the optimal limit, a user will get notified about the proper action needed to normalize the situation. Also, with MacFly Pro, you can search for and delete duplicates, perform secure data erase and, of course, uninstall apps with all related files scattered around the system. All in all, if you’re looking for a reliable and legit cleaning application, we suggest you try MFP.
Final Thoughts
Advanced Mac Cleaner is quite hard to remove without any trace. Yet, it is possible to do using either Mac’s onboard utilities or free and paid third-party apps. The latter option appears to be less time-consuming and more efficient in terms of residual application data removal. Still, the best way to prevent unwanted soft or malware from getting on your Mac is to steer clear of installing any suspicious/bundled apps. Keeping your Mac clean and removing unnecessary apps on time will ensure its fast and stable performance.

